Inspired by a recent post on the GP Newgroup, I've taken the time to document a simple customization I recently did for a client. This is a very common type of request that is relatively easy to do and adds a lot of value. You can greatly improve the quality and consistency of your data by using custom drop down lists instead of settling with free form text fields.
Some background on this example; The client needs to track an invoice format for each Customer. They have 3 different invoice formats and it is critical that each customer is assigned a valid format. This client uses Contract Administration for Billing. Another customization is reliant on this field to assign the Contract Type to new Contracts that corresponds to the customer's invoice format so that invoices are batched properly when Contracts are billed. Standardization and consistency are critical.
bolUserChanged = False
End Sub
If CustomerID.Empty = False Then
End Sub
Private Sub UserDefined2_Changed()
If bolUserChanged = False Then
End Sub
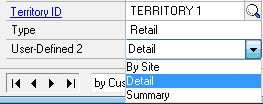
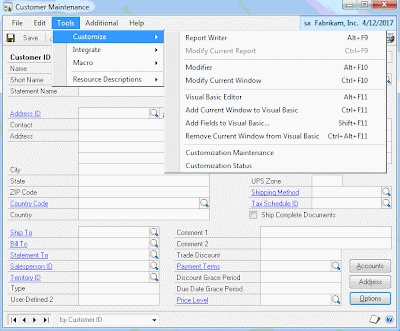
First, open the window, Customer Maintenance in this example, on which you want to add the drop down list and bounce into Modifier (CTRL+F10 or Tools>>Customize>>Modify Current Window).

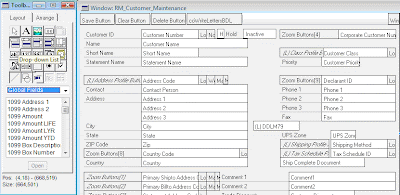
In modifier, select the Drop-down List control from the Toolbox and add one to the Window. At this point, any free peice of real estate on the window will do. We'll move it into the right position later. I've added the (L) DDLM79 field you see just to the right of the City field in the screen shot below.

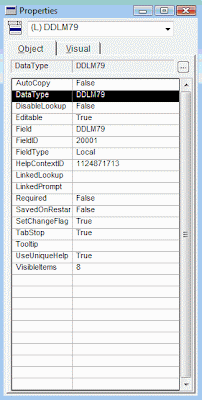
Next, change a few of the properties of the new Drop-down List (DDL) field. Click on the DDL and find the Properties window. It might be hidden behind another window. To activate it you could select Properties from the Layout Menu or enter CTRL+M.

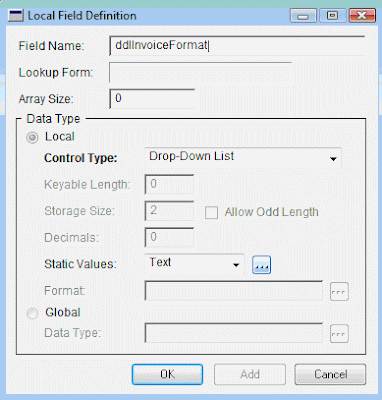
On the Object Tab double click the Data Type entry to open the Local Field Definition window. I like to change the name to something logical; in this example, "ddlInvoiceFormat".

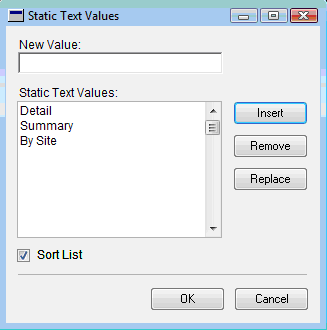
Then click the Static Value elipse to access the Static Text Values Window. Enter the values you want to appear in your drop down list and click Insert.
You're done with Modifier for now. Click Ok to close the Static Text Values and Local Field Definition Windows. Then select Microsoft Dynamics GP from the File menu to return to GP. When prompted, save the changes made to the window layout. Once back in GP, grant security to the modified window.
Now, you have a Drop-down List on your window with your static values. That's nice but only half the battle. Next, we need to add the VBA code to store the data. In this example, I chose to store the data in the User Defined 2 field on the Customer Maintenance window. You could have elected to store this in your own table (using ADO) or the DUOS.
To do this, open the Customer Maintenance window and add the window to your VBA project (CTRL+F11 or Tools>>Customize>>Add Current Window to Visual Basic). Then, add the fields you need on the window to your VBA project (Shift+F11 or Tools>>Customize>>Add Fields to Visual Basic). In this example, add the Customer ID, User Defined 2, and the new Drop-down List (ddlInvoiceFormat). Finally, open the VBA Editor (Alt+F11 or Tools>>Customize>>Visual Basic Editor) to add the code.
There is code on on 3 events:
Declare a variable to track whether or not a user has changed the Drop-down List (DDL) value.
Dim bolUserChanged As Boolean
On the CustomerID_Changed event set that variable to false.
Private Sub CustomerID_Changed()
bolUserChanged = False
End Sub
On the ddlInvoiceFormat_AfterUserChanged event set the UserDefined2 value equal to the Drop-down List value and the variable to True only if the CustomerID is empty. There's no point in setting the value otherwise.
Private Sub ddlInvoiceFormat_AfterUserChanged()
If CustomerID.Empty = False Then
bolUserChanged = True
UserDefined2.Value = ddlInvoiceFormat.Value
Else
Changed = False
bolUserChanged = False
End If
End Sub
Only if a User did not change the ddlInvoiceFormat value (bolUserChanged = False) set the ddlInvoiceFormat equal to the UserDefined2 value. This is how the value in the Drop-down List gets updated as you scroll through or select different records in the window. Of course, you wouldn't want to update the DDL if the user just changed it.
Private Sub UserDefined2_Changed()
If bolUserChanged = False Then
ddlInvoiceFormat.Value = UserDefined2.Value
End If
End Sub
The reason for putting the new Drop-down List field on the window anywhere space was available was to allow for testing and validation before moving it to a permanent place. You'll notice that the value stored in the User Defined field is an integer value that corresponds to each static text value. You could translate that with VBA and store the static text value or translate it when necessary later in a query or report. Once the code is in place and tested, go back into Modifier (Tools>>Customize>>Modify Current Window) to move it to a permanent position and in this case make the User Defined 2 field invisible.
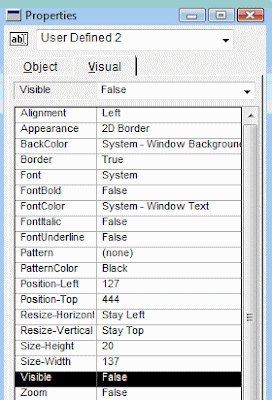
Click on the User Defined 2 field and change the Visible Property to False. The new Drop-down List will replace that field on the window for the user.
Finally, move the new Drop-down List on top of the User Defined 2 field then change the tab sequence and size/align the field accordingly. The end result is a User Defined field that is no longer a free form text but rather a Drop-down List.


2 comments:
Great instructions! Worked like a charm. Can you also show me how to store the text values in the field as opposed to the integer?
I personally never solved that problem. If you figure that our please share it with the community.
Post a Comment